Stop watering right away, pull the plant out of its pot, cut off any brown or mushy roots, and repot it into dry, fast-draining soil. Then wait several days before watering again. Most overwatered plants recover within two to four weeks if you catch the problem early enough. Learn plant is overwatered or has cold damage from this article. Overwatering can cause crispy leaves too. Here’s how to tell the difference.
That’s the fast version. But if you want your plant to actually pull through, not just survive the repotting but come back strong, there’s a bit more to the story. Not every overwatered plant needs the same treatment, and a few common “recovery” habits actually slow healing down or kill the plant outright. This checklist walks you through exactly what to do, in what order, and what to expect along the way.
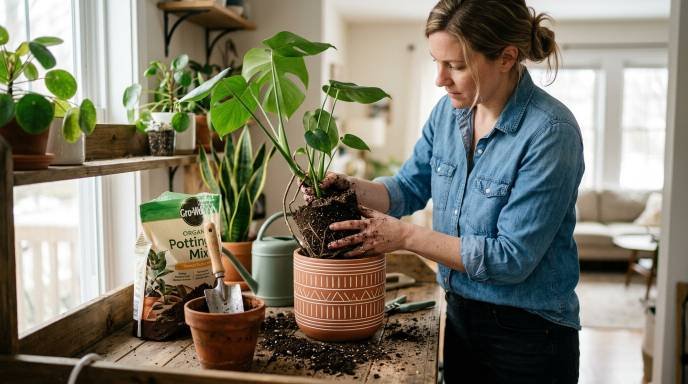
A friend of mine, Priya, once drowned her fiddle leaf fig out of love, watering it daily “just in case.” By the time she asked me for help, half the leaves had gone yellow. Two weeks after we repotted it dry, it started pushing out new growth.
How to Know If Your Plant Is Actually Overwatered
Before you do anything drastic, confirm what you’re dealing with. Yellow, droopy leaves look almost identical whether a plant is drowning or dying of thirst, and treating the wrong problem can finish off a plant that could have been saved.
Here’s a quick way to tell the two apart:
- Soil test: Push a finger two inches into the soil. If it’s soggy or clumps together, that points to overwatering. Bone-dry, crumbly soil points to underwatering.
- Smell test: A sour, musty, or “swampy” smell coming from the pot usually means standing water and early rot.
- Leaf texture: Overwatered leaves tend to feel soft, mushy, or almost translucent. Underwatered leaves feel dry, crispy, or papery.
- Pot weight: A pot that feels unusually heavy for its size is holding excess water.
If you don’t want to guess, a cheap moisture meter takes the guesswork out entirely:
Insert it near the roots, and a reading in the “wet” zone confirms the diagnosis. When you want to buy a moisture meter, you can go through this guide on the best moisture meter.
Once you’ve confirmed it really is an overwatered plant, move on to treatment.
Step 1: Stop Watering Immediately
This sounds obvious, but it’s the step most people skip because it feels like doing nothing. Roots that are sitting in wet soil are already short on oxygen, and adding more water only speeds up rot.
- Move the plant somewhere with good airflow.
- Skip watering entirely until the soil has visibly dried at least an inch or two deep.
- Depending on pot size and material, this can take anywhere from three days to two weeks. Terracotta pots dry faster than plastic or ceramic ones.
Resist the urge to check on it every day by poking the soil repeatedly. Disturbing already-stressed roots slows recovery.
Step 2: Assess How Bad the Damage Is Before You Repot
This is the part almost every other guide skips, and it’s the difference between a plant that bounces back and one that gets damaged further by well-meaning intervention. Not every overwatered plant needs to be yanked out and have its roots cut.
Mild overwatering:
Soil is soggy, but the plant still looks mostly upright and green:
- Leave the plant in its pot.
- Improve drainage by tilting the pot to drain excess water, or elevate it slightly.
- Move it to bright, indirect light and stop watering until fully dry.
- No repotting needed at this stage.
Moderate overwatering:
Some yellowing, a few soft stems, maybe a faint smell:
- Remove the plant from the pot.
- Inspect the roots.
- Trim away only the roots that are clearly damaged.
- Repot into fresh soil.
Severe overwatering:
Strong foul smell, mushy stem base, leaves collapsing:
- Full repot is necessary.
- Significant root trimming will likely be required.
- Take a healthy cutting as a backup in case the main plant doesn’t make it (more on this later).
Matching your response to the actual severity avoids two common mistakes: doing nothing when the plant needs surgery, or over-handling a plant that just needed to dry out. Use the hygrometer as a preventive monitoring tool to avoid overwatering in the future.
Step 3: Remove the Plant and Inspect the Roots
For moderate to severe cases, it’s time to take the plant out of its pot.
- Turn the pot on its side and gently loosen the edges of the soil with your fingers.
- Slide the plant out slowly, supporting the base of the stem.
- Shake off as much loose soil as you can, then rinse the remaining soil off the roots under lukewarm running water so you can see them clearly.
For all this to work, you need a good gardening tool kit. Learn about the best gardening tool kits from this article. Now look closely at what you’re working with:
- Healthy roots are white, light tan, or pale yellow, and feel firm when you press them.
- Rotted roots are brown or black, feel mushy or slimy, and often fall apart or smell bad when touched.
This inspection tells you exactly how much needs to be cut away, and how much of the plant is still salvageable.
Step 4: Trim the Root Rot the Right Way
Cutting roots feels drastic, but leaving rotted tissue in place lets the rot spread to the healthy parts of the root system.
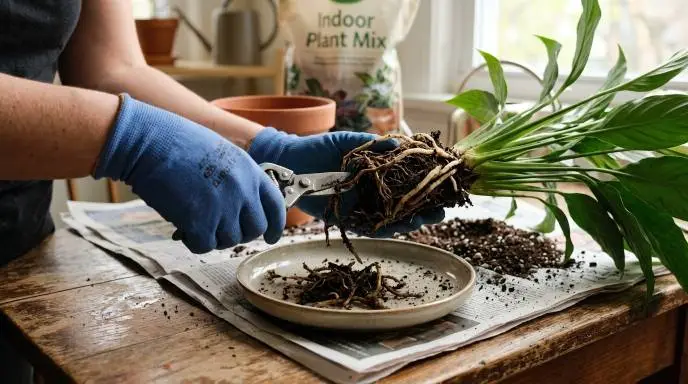
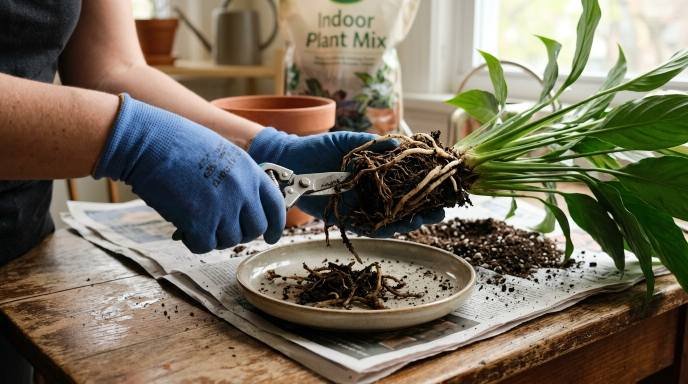
- Use scissors or shears that have been wiped down with rubbing alcohol: unsterilized tools can introduce fungal or bacterial infection to freshly cut roots.
- Cut away anything brown, black, mushy, or hollow.
- Leave firm, light-colored roots completely alone.
- If more than half the root system is damaged, only remove what’s clearly dead. Cutting too aggressively out of panic can leave the plant with too few roots to support itself.
Some growers dust the cut ends with cinnamon, which has mild antifungal properties, or a diluted fungicide before repotting. It’s optional, but it can help prevent new rot from starting at the cut sites.
Step 5: Repot Into Fresh, Fast-Draining Soil
This is where a lot of recovery attempts quietly fail: not because of the trimming, but because of what happens after.
- Pot size: Choose a pot the same size as the old one, or only slightly bigger. An oversized pot holds more soil than the roots can absorb water from, which sets the plant up to be overwatered all over again. Learn about the best gardening pots in this article.
- Soil mix: Standard potting mix alone often holds too much moisture for a recovering plant. Mix in perlite, coarse sand, or orchid bark at roughly a 2:1 ratio (two parts potting soil to one part perlite) to improve drainage. Learn about the best soil mixes from this article.
- Drainage holes: Non-negotiable. A pot without proper drainage undoes everything else on this list. using perlite in your potting mix.
- Plant it gently, without packing the soil down firmly. Compacted soil holds more water and gives new roots less room to grow into.
Step 6: Aftercare: What to Expect in the First Two Weeks
Recovery isn’t instant, and knowing the rough timeline stops you from panicking or overwatering out of impatience.
Days 1–3:
The plant may look worse before it looks better. Some leaf drop or continued yellowing at this stage is normal: it’s the plant shedding damaged tissue it can’t repair.
Days 4–10:
Check the soil with your finger every couple of days rather than watering on a schedule. Water lightly only once the top two inches are fully dry. Keep the plant in bright, indirect light. Direct sun adds heat stress on top of root stress.
Weeks 2–4:
- Signs of recovery: new leaf growth, firming stems, leaves that no longer feel mushy.
- Signs it isn’t working: continued mushiness at the base, a spreading smell, or leaves that keep collapsing despite dry soil. At this point, the plant may be past saving, and propagating a healthy cutting becomes the better use of your time.
Five Mistakes People Make While Rehydrating a Bone-Dry Plant
Most plants that don’t recover aren’t lost from the dryness itself. They’re lost from what happens during the rescue attempt.
- Watering heavily from the top instead of soaking from below:
This just runs off the hydrophobic soil without actually reaching the roots. Learn about the best long sprout watering can from this article. - Resuming a full watering schedule immediately:
One soak doesn’t mean the plant is back to normal. It still needs a few days to stabilize. - Placing the plant in direct sun to “perk it up faster“:
This adds heat stress right when the plant is least equipped to handle it. - Fertilizing right after rehydration:
Feeding stressed roots too early can do more harm than the dryness itself. - Ignoring the drainage holes:
A plant rescued from bone-dry soil can just as easily be lost to root rot a week later if water has nowhere to escape.
Plant-Specific Recovery Notes
Not all houseplants respond to overwatering (or recovery) the same way.
- Succulents and cacti:
These store water in their leaves, so overwatering damage often shows up fast and severely. Full recovery sometimes isn’t possible, and propagating a healthy leaf or cutting is often more reliable than trying to save the original plant. - Tropical foliage (pothos, monstera, philodendron):
These are generally the most forgiving. They tolerate root trimming well and often bounce back within two to three weeks. - Thick-rooted plants (peace lily, ZZ plant):
These store water in their roots or rhizomes, so damage can be slower to show and slower to recover from. Patience matters more here than with thinner-rooted plants.
When to Keep Trying, and When to Let Go
It’s worth being honest here: not every overwatered plant can be saved, and that’s not a failure on your part.
Signs the plant likely won’t recover:
- The main stem is soft or mushy all the way through, not just at the base.
- Nearly all the roots were black, hollow, or rotted through during inspection.
- There’s no new growth after three to four weeks of correct aftercare.
What to do instead:
If a few stems or leaves still look healthy, take cuttings and propagate them in water or fresh soil. This way, even if the original plant doesn’t make it, you don’t lose the plant entirely: you start over with a clean, healthy copy of it.
How to Prevent This From Happening Again
Once the plant has recovered, the goal is to avoid repeating the cycle. For the full picture on causes, warning signs, and prevention, see our pillar guide on The Complete Beginner’s Guide to Indoor Plant Care
- Water based on soil dryness, not a fixed schedule: check with a finger or moisture meter before every watering.
- Make sure every pot has drainage holes, no exceptions.
- Adjust watering frequency seasonally: most houseplants need less water in fall and winter.
For a full breakdown of watering frequency by plant type and season, see our guide on how often to water indoor plants.
Frequently Asked Questions
How long does it take for an overwatered plant to recover?
Most plants show early signs of recovery within two to four weeks, though full recovery can take up to two months for more severely affected plants.
Can an overwatered plant be saved after root rot?
Yes, in many cases, as long as some healthy, firm roots remain after trimming away the rotted portions and the plant is repotted correctly.
Should I remove all the wet soil or just some?
Remove as much of the old, wet soil as you can without damaging the roots. Rinsing the roots under water is the easiest way to clear soil without extra stress.
Do I need to repot every overwatered plant?
No. Mildly overwatered plants often recover just by drying out in their existing pot. Repotting is mainly needed for moderate to severe cases with root damage.
How do I know if my plant is beyond saving?
If the main stem is mushy throughout, most of the roots are black and hollow, or there’s no new growth after a month of proper aftercare, the plant likely won’t recover, though propagating a healthy cutting can still save the plant genetically.
Final Thoughts
An overwatered plant looks alarming, but in most cases, it’s fixable if you act quickly and match your response to how bad the damage actually is. Stop watering, check the roots honestly, trim only what’s truly damaged, and give the plant time and dry, well-draining soil to recover. Not every plant makes it, but with the right steps, most do. If you’ve ruled out watering issues, check our bacterial vs. fungal vs. sunburn guide.