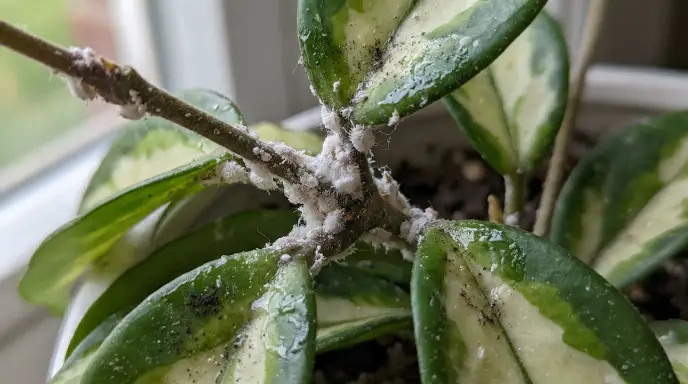
Mealybugs keep coming back because a single spray or swab pass kills the visible adults but leaves the eggs behind, and most people stop treating right around week two — just as the next generation hatches. The fix isn’t a stronger product. It’s sticking to a timed schedule long enough to break the life cycle completely, which for indoor conditions takes about six weeks.
That’s the plan below: what to do each week, why the timing matters, and where relapses actually come from (hint: it’s usually the roots or the pot rim, not the leaves you already treated). If you’re not fully sure what you’re dealing with yet, our guide to diagnosing indoor plant problems can help rule other issues in or out first.
Quick Answer
Mealybugs are removed with 70% isopropyl alcohol and insecticidal soap applied on a fixed schedule for six weeks — not a single treatment. Wipe or spray visible colonies weekly, check leaf axils and the root ball for eggs and root mealybugs, and don’t declare the plant clear until you’ve gone two full weeks without finding a single live insect.
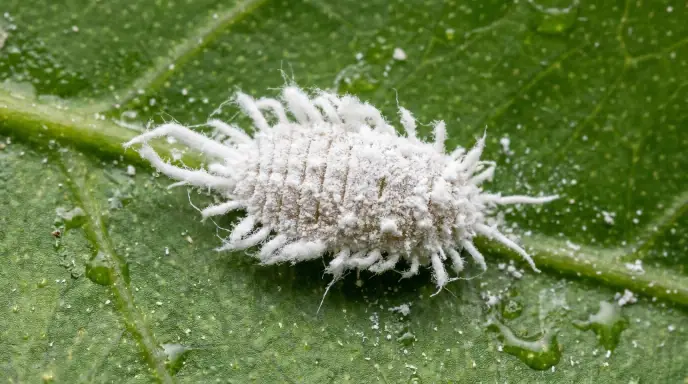
Table of Contents
| Week | Primary Action | Time Required | What You’re Targeting |
|---|---|---|---|
| 1 | Mechanical removal with 70% alcohol | 15–30 min | Visible adults and colonies |
| 2 | First insecticidal soap or oil spray | 15–20 min | Newly hatched crawlers |
| 3 | Unpot and inspect the root ball | 20–30 min | Root mealybugs, hidden eggs |
| 4 | Reduced-intensity maintenance spray | 10–15 min | Any survivors, phytotoxicity check |
| 5 | Verification sweep, no spray unless needed | 10 min | Confirmation the population is gone |
| 6 | Final inspection and reintegration | 10 min | Clearance and shelf placement |
This schedule is built to survive real life — miss a day here or there and you’re still fine. Week 3 is where most people quit, usually because the plant looks fine on top. That’s exactly the week the root check matters most.
How to Confirm It’s Actually Mealybugs
White fuzzy residue on a houseplant isn’t always a mealybug. Powdery mildew, perlite chips, salt deposits, and dried spray residue all get mistaken for it — and treating the wrong problem wastes your first two weeks. If you’re also noticing brown spots on your plant’s leaves, our guide to bacterial vs. fungal vs. sunburn can help you identify the cause. For a broader symptom-by-symptom breakdown, see why your houseplant might be dying.
The Cotton Swab Test
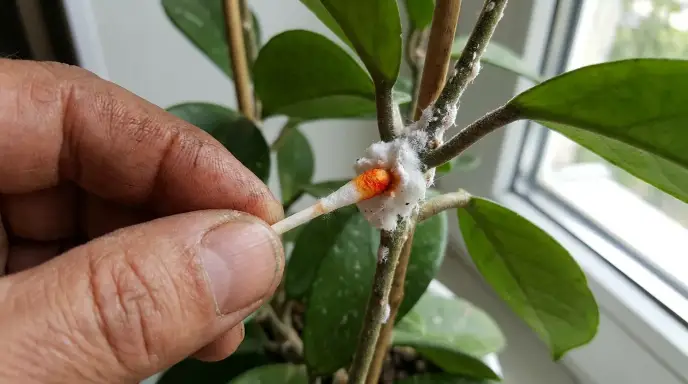
- Dampen a cotton swab with rubbing alcohol.
- Press it directly onto the white fuzzy material.
- Check the tip.
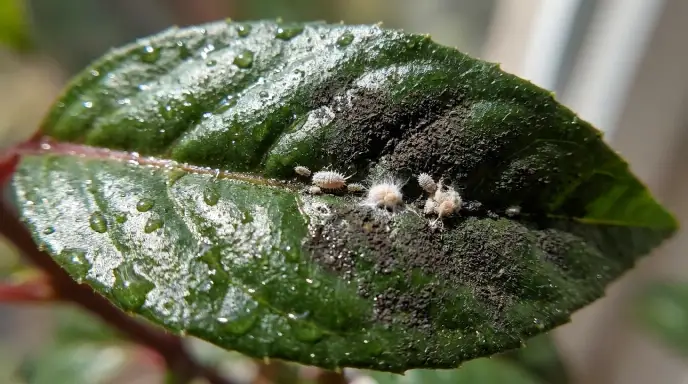
If the residue smears into a rust-orange or pinkish stain, you’re looking at a crushed mealybug — the color comes from its body fluids, not a fungus. Powdery mildew stays white and dusty on the swab.
Mealybugs vs. Scale vs. Woolly Aphids vs. Powdery Mildew
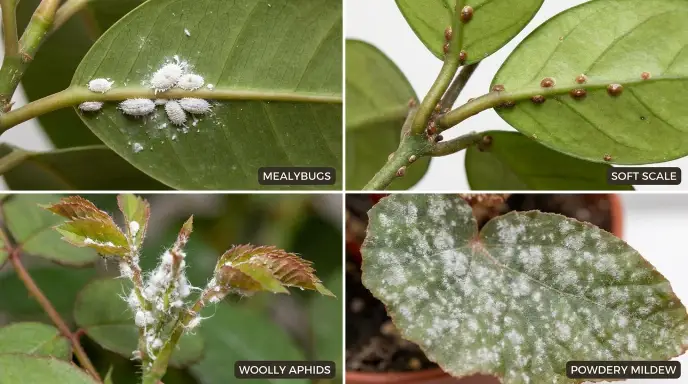
| Feature | Mealybug | Soft Scale | Woolly Aphid | Powdery Mildew |
|---|---|---|---|---|
| Texture | Cottony, fuzzy tufts | Smooth, waxy bump | Fluffy, cotton-like | Flat, powdery dust |
| Mobility | Crawlers mobile, adults slow | Stationary once settled | Mobile | None (fungus) |
| Common location | Leaf axils, stem joints, roots | Stems, leaf undersides | New growth, stems | Leaf surfaces |
| Crush test | Rust/pink stain | Yellowish fluid | Dark stain | No stain, stays powdery |
Mealybugs aren’t the only pest that gets misdiagnosed this way — if what you’re seeing is more like tiny moving dots and fine webbing instead of cottony tufts, check our guide on confirming and treating spider mites instead.
The Two Species You’ll Actually Meet Indoors
Most houseplant infestations are one of two species: the citrus mealybug (Planococcus citri) or the long-tailed mealybug (Pseudococcus longispinus). This distinction matters because of a piece of advice that trips people up constantly — searching for cottony egg sacs. Long-tailed mealybugs don’t lay visible egg masses; they give birth to live young that are already mobile. If you’re not finding egg sacs but keep spotting new juveniles anyway, you’re likely dealing with a live-bearing species — shorten your check interval to every 5 days instead of 7.
Where to Look (the Five Places People Miss)
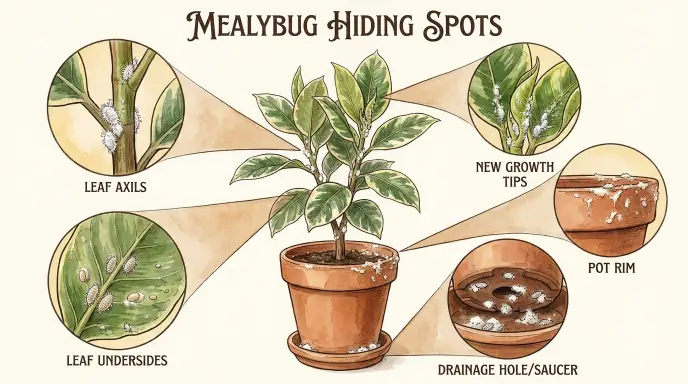
- Leaf axils — press a fingertip into the joint where leaf meets stem; colonies wedge in tight.
- New growth tips — soft tissue is easiest for crawlers to pierce and feed on.
- Leaf undersides along the midrib — check with a flashlight at an angle.
- The pot rim, under the lip — run a fingernail along the inside edge where soil meets plastic.
- Drainage holes and the saucer — crawlers gather where moisture and shelter overlap.
Why Mealybugs Keep Coming Back
Egg → Crawler → Adult: The Indoor Clock
Indoors, a mealybug’s full life cycle from egg to reproducing adult generally runs six to nine weeks, and eggs typically hatch within one to two weeks of being laid. Because a single female can lay well over a hundred eggs over a 10–20 day span, an indoor population usually has several overlapping generations at once—some in the egg stage, some crawling, and some already adult and laying more eggs.
This is why a contact treatment like alcohol looks like it worked. The visible adults die within minutes of contact, and the plant looks clean. But alcohol and soap only kill on contact — they don’t reach eggs tucked into leaf joints or under waxy coatings that haven’t been directly touched. Those eggs hatch on schedule, no matter how clean the plant looked last week.
Takeaway: one treatment kills what you can see. Only a repeated schedule catches what hatches after.
How Your Thermostat Sets the Infestation Speed
Outdoors, cold winters slow or stop mealybug reproduction. Indoors, a heated home holds a steady 65–75°F (18–24°C) year-round — ideal breeding conditions with no seasonal slowdown. Raising humidity doesn’t change this; mealybugs aren’t moisture-dependent the way spider mites are sensitive to dryness. Your home has no winter, as far as a mealybug is concerned, which is the core reason indoor infestations can outlast anything you’d expect from a garden pest.
Before You Treat: 30-Minute Triage
What you do in the first half hour affects whether this stays a one-plant problem.
Isolate First
Move the plant away from your collection immediately, even without a dedicated space — a bathtub or sink area works. Crawlers disperse by walking from leaf to leaf when plants touch, and by air currents from fans or HVAC vents, so distance matters more than the specific room.
Inspect Every Neighbor Within Arm’s Reach
Any plant whose leaves were touching the infested one needs the same cotton-swab check. Crawlers move fast in the first hours after hatching, and it’s common to find two or three additional infested plants within a few weeks of the first discovery if this step gets skipped.
Check the Pot Rim, Drainage Holes, and Saucer
This is the reservoir most people never treat. Mealybugs shelter under the pot lip and in the saucer even after the visible foliage is clean, and they’ll simply climb back up. Run a fingernail under the rim — if it comes back with white residue, treat the pot itself, not just the plant.
Treat or Toss? A Decision Framework
| Infestation Level | Plant Value | Recommendation | Reasoning |
|---|---|---|---|
| Light (few visible bugs) | Any | Treat | Six-week plan is straightforward at this stage |
| Heavy (colonies throughout, weakened growth) | Low-cost/replaceable | Consider discarding | Full treatment runs roughly three hours of labor across six weeks |
| Heavy | Sentimental/expensive/rare | Treat | Value justifies the time investment |
| Root mealybugs on a struggling plant | Low-cost | Consider discarding | Root treatment plus recovery time is the most labor-intensive path |
There’s no shame in tossing a heavily infested, inexpensive plant. Weigh the roughly three hours of cumulative labor against what the plant is actually worth to you.
The 6-Week Treatment Plan
Each week follows the same structure so it’s easy to return to as a reference.
Week 1 — Mechanical Knockdown
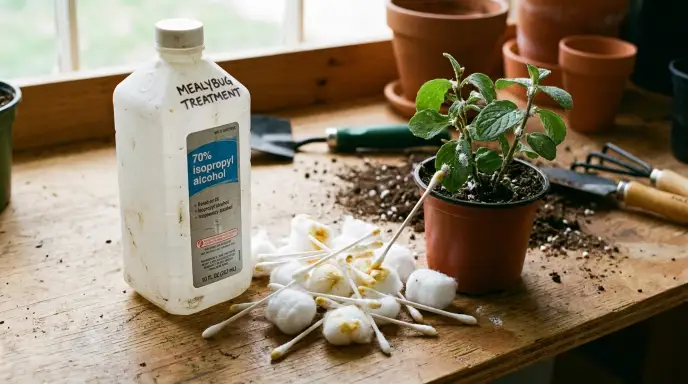
Use 70% isopropyl alcohol, not 91% or higher. The 30% water content in 70% alcohol slows evaporation just enough for it to dissolve the mealybug’s waxy coating before it flashes off — higher concentrations evaporate too fast to fully penetrate the wax, and they raise the risk of leaf burn, especially on thin-leaved or farina-coated plants like many succulents.
- Dip a cotton swab in 70% alcohol and dab every visible colony directly.
- For heavier infestations, mix a diluted spray (roughly 1 part alcohol to 3 parts water) and mist the whole plant, focusing on axils and undersides.
- Let it sit 15–30 minutes, then rinse with plain water to limit residue contact.
Caution: never use denatured alcohol, hand sanitizer, or anything above 70–75% concentration on soft, thin, or farina-dusted foliage without a patch test first.
Week 2 — First Crawler Intercept
Around day 7, eggs that survived week 1’s contact treatment begin hatching. The newly emerged crawler is the most vulnerable stage in the entire life cycle — it hasn’t built its waxy protective coating yet.
- Spray insecticidal soap or a diluted horticultural oil over the full plant, including undersides.
- Ensure complete coverage — soap only works on direct contact.
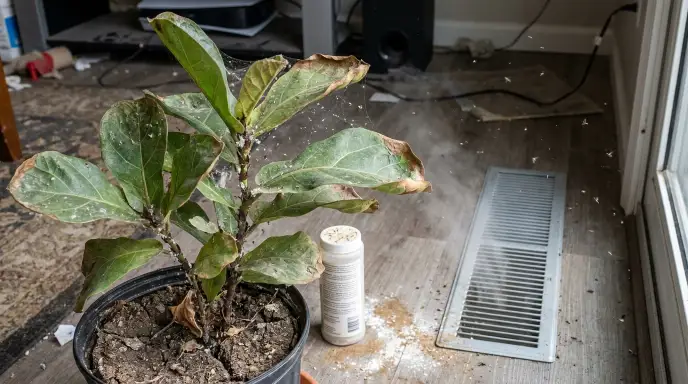
- If near an HVAC vent, close it for 30 minutes so the spray stays wet long enough to work.
This is arguably the single most important treatment of the six weeks, since it’s timed to catch the generation that got missed the first time.
Week 3 — Root Zone Check
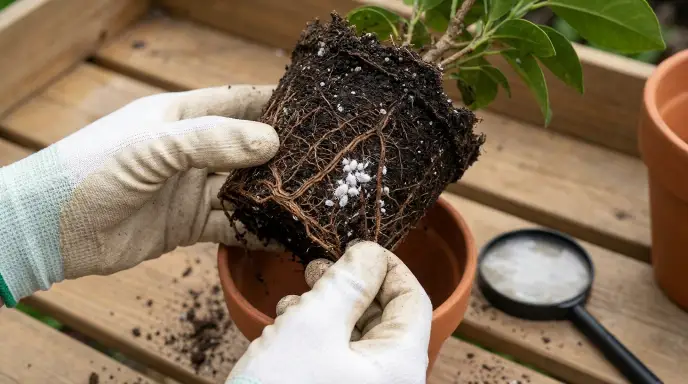
Unpot the plant and inspect the root ball. This step is non-negotiable, and it’s also the week the plant typically looks fully recovered on top — which is exactly why people quit here.
- Gently remove the plant from its pot.
- Check the root ball, especially where roots meet the pot wall, for white cottony residue.
- Note the soil weight and smell — heavier, sour-smelling soil combined with weak, mushy roots can point to root rot developing alongside the pest problem, not mealybugs alone. If you’re seeing yellowing leaves alongside other symptoms, our guide to overwatering vs. underwatering can help you distinguish between the two.
If you find root mealybugs, skip ahead to the root mealybug protocol below before continuing the weekly schedule.
Week 4 — Reduced-Intensity Maintenance
Ease off the treatment intensity and raise inspection quality instead. Repeated oil or alcohol applications without a break can cause cumulative leaf stress — yellowing, dulled color, or crisping at the edges — that’s easy to mistake for ongoing pest damage.
Spot-treat only what you actually find this week rather than spraying the whole plant preventively.
Week 5 — Verification Sweep
Inspect thoroughly but only spray if you find something. Check the surfaces around the plant too — the shelf, windowsill, or tray — since mealybugs can persist off-plant for over a week and crawlers can keep emerging from residual egg sacs for weeks after the adults are gone.
Week 6 — Clearance and Reintegration
Clearance checklist:
- No live insects found in two consecutive inspections
- No new honeydew or sticky residue
- Root ball and pot rim clean on the last check
- New growth emerging without distortion
Reintegrate the plant to the edge of your collection rather than back into the middle for the first month, so any missed survivor doesn’t have a direct path to its neighbors.
What Actually Kills Mealybugs (and What Doesn’t)
If you don’t already have these products on hand, our roundup of the best houseplant pest control products compares specific brands across all of the categories below.
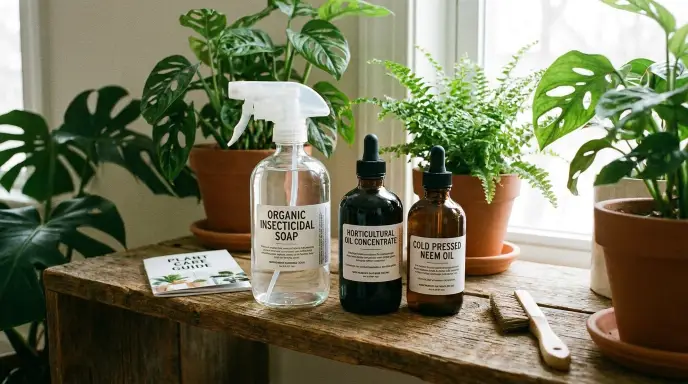
| Method | How It Works | Best For | Limits |
|---|---|---|---|
| 70% isopropyl alcohol | Dissolves waxy coating on contact | Spot treatment, visible colonies | No residual effect, doesn’t reliably kill unhatched eggs |
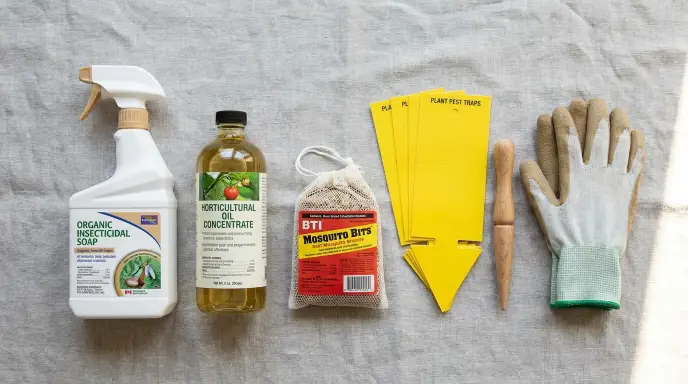
| Insecticidal soap | Fatty-acid salts disrupt cell membranes on contact | Full-plant treatment, crawler stage | Requires complete coverage, no residual |
| Horticultural oil/neem | Smothers insects; neem’s azadirachtin disrupts growth and feeding | Ongoing suppression, egg-adjacent stages | Never apply in direct light or above ~90°F (32°C); needs an emulsifier to mix with water |
| Systemic insecticides | Absorbed into plant tissue; mealybugs ingest it while feeding | Severe or recurring infestations | Not for edible plants unless labeled for food crops; pollinator risk if the plant flowers outdoors; some regions restrict consumer neonicotinoid sales — check your state or local rules and always follow the label |
What doesn’t work: dish soap alone (damages leaves without reliably killing the pest), vinegar, hydrogen peroxide sprays, cinnamon, and any single one-time treatment. Wiping mealybugs off by hand without a follow-up schedule just delays the same infestation by a couple of weeks.
Plant Sensitivity: What Not to Spray on What
Some houseplants are considerably more sensitive to alcohol and oils than others, and the pest treatment itself can do more visible damage than the mealybugs.
- Succulents and plants with farina (like Echeveria and some Sedum): alcohol strips the powdery coating (farina) permanently — it doesn’t grow back on that leaf. Use the most diluted spot treatment possible, or hand-remove pests with a dry swab first.
- Thin-leaved plants (Calathea, Maranta, ferns, Begonia): patch-test any spray on one leaf and wait 24 hours before treating the whole plant.
- Hoyas and other waxy-leaved plants: generally tolerate 70% alcohol well, but avoid spraying in direct sun.
- Any plant under grow lights: move it out of direct light before applying oil-based treatments — oil under intense light can scorch foliage within hours.
When in doubt, treat a single leaf first and check it the next day before committing the whole plant.
Root Mealybugs: The Reason Your Plant Relapsed
If a plant keeps declining despite clean-looking foliage, the population may be living in the soil. Root mealybugs (commonly Rhizoecus species) never move above the soil line, so leaf treatments never reach them.
How to Tell Root Mealybugs From Perlite
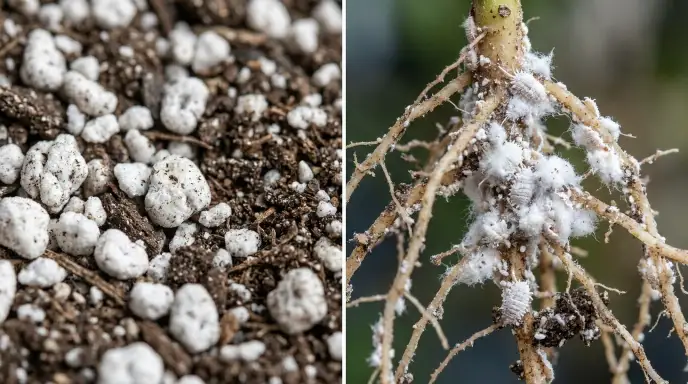
Perlite is hard, white, and inert — it won’t crush or smear. Root mealybug deposits are soft, crush to a powder under light pressure, and tend to cluster along the inside wall of the pot where the root ball meets the plastic, rather than being scattered evenly through the mix.
The Bare-Root Wash and Repot Protocol
- Remove the plant from its pot and gently crumble away as much old soil as possible.
- Rinse the bare root ball under lukewarm running water until the soil is fully washed away.
- Discard the old potting mix entirely — don’t reuse or compost it indoors, since it can carry eggs.
- Scrub the old pot with hot, soapy water, or use a fresh pot.
- Repot into a fresh, well-draining mix. For aroids, a starting ratio around 50% bark, 30% perlite, and 20% coir works well — see our chunky aroid mix recipe for the full method, and adjust by species rather than treating it as a universal formula. For a broader look at what makes a well-draining potting mix, our guide to the best potting soil for indoor plants covers what to look for and what to avoid.
If this is your first time repotting a stressed plant, our guide on how to repot a houseplant without killing it covers the technique in more depth, and it’s worth checking whether it’s even the right time of year to repot before you commit to the full protocol on a plant that’s already stressed.
Post-Repot Recovery
A root-pruned plant needs bright, indirect light while it re-establishes — not direct sun, which stresses roots that are already recovering. Exact light-intensity numbers vary by measurement method and light spectrum, so treat any specific figures as general guidance rather than a strict threshold.
The Mealybug Diagnostic Table
| Sign | Likely Cause | Immediate Action | Prevention |
|---|---|---|---|
| White fuzz in leaf axils | Active colony | Alcohol swab, start 6-week plan | Weekly axil checks on high-risk plants |
| Sticky residue on leaves or floor | Honeydew from feeding | Wipe down, treat plant | Regular inspection |
| Plant declining, no visible bugs on leaves | Root mealybugs | Unpot and inspect roots | Root check at every repot |
| New white powder near pot rim | Reservoir colony in pot lip | Clean rim, treat soil surface | Wash pots between uses |
| Bugs return after 2 clean weeks | Missed egg cluster or root colony | Restart from week 1, check roots | Extend interval to 5 days for live-bearing species |
Still Finding Mealybugs at Week 4? Troubleshooting
If treatment isn’t working by week 4, the cause is almost always one of these:
- Root mealybugs were never checked — unpot and inspect now.
- The pot rim or saucer was never treated — clean the reservoir, not just the plant.
- A neighboring plant is reinfesting this one — recheck every plant that’s touched this one recently.
- Alcohol concentration was too weak or too strong — confirm you’re using 70%, correctly diluted if starting from a higher concentration.
- Treatment interval slipped past 10–14 days — eggs had time to mature into adults between applications.
This is a common process failure, not a sign you’re doing something fundamentally wrong — restart the schedule from week 1 with the missed step corrected. If the plant is showing broader decline that doesn’t fit this pattern, our symptom-by-symptom dying-plant guide can help rule out an unrelated issue.
Preventing the Next Infestation
The 3-Week New Plant Quarantine SOP
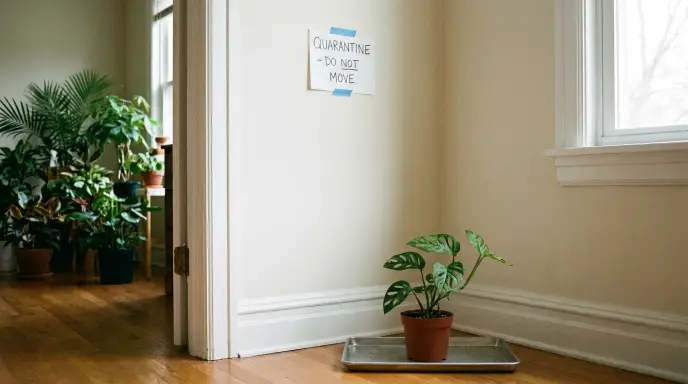
- Isolate any new plant from your collection immediately on arrival.
- Unpot it and inspect the root ball before it touches a shelf.
- Check leaf axils and undersides weekly for three weeks.
- Treat proactively with a spot alcohol wipe if anything looks suspicious, even before confirming a full infestation.
- Only integrate into the main collection after three clean weeks.
Most mealybug infestations arrive on a new plant, so this single habit prevents more outbreaks than any spray. The same quarantine approach also works for other common pests like fungus gnats — see our complete guide to getting rid of fungus gnats for good.
Monthly Sentinel Checks
Rather than superficially scanning your whole collection, designate three plants — ideally ones that have had pest issues before, or fast-growers that show stress early — and inspect them thoroughly every month. A system you’ll actually keep up with beats a more thorough one you’ll abandon after a few weeks.
Household Realities That Sabotage Treatment
| The Problem | The Workaround |
|---|---|
| HVAC vents dry sprays before they work | Close the vent for 30 minutes during treatment |
| Forced-air heat keeps temperatures ideal for breeding year-round | No environmental fix — rely on the treatment schedule, not temperature |
| Humidifiers create false confidence (“it’s too humid for pests”) | Humidity doesn’t affect mealybugs — don’t skip treatment based on it |
| Dust on leaves hides early colonies | Wipe leaves during each weekly check, not just when treating |
| Shared trays and saucers spread crawlers between pots. Give each plant its own saucer during active treatment. Choosing the right pot with a drainage hole from the start also helps prevent moisture issues that attract pests. | Give each plant its own saucer during active treatment |
| Busy schedules cause skipped weeks | Set a recurring reminder tied to a day you already check plants, like watering day |
Frequently Asked Questions
How long until mealybugs are gone?
Most infestations clear in six weeks with consistent weekly treatment. Isolated cases can resolve faster; heavy or root-level infestations sometimes need a second cycle.
Are mealybugs harmful to humans or pets?
No. Mealybugs don’t bite, sting, or carry disease that affects people or animals. They’re strictly a plant pest, though the honeydew they excrete can attract ants or sooty mold.
Can mealybugs spread to other rooms?
Yes, if infested plants move between rooms or share airflow through open doors or HVAC vents. They travel by crawling and by hitching a ride on hands, tools, or clothing.
Will mealybugs go away on their own?
No. Indoor conditions have no natural population control like cold winters do outdoors, so infestations grow rather than resolve on their own.
Can I still propagate from an infested plant?
Wait until the plant is fully clear. Cuttings can carry eggs or crawlers, which start a new infestation in a fresh pot.
Do I have to throw away the soil?
Yes, if root mealybugs are found. Standard potting mix from an infested pot can harbor eggs and should be discarded rather than composted indoors or reused.
The Bottom Line
Mealybugs return when treatment stops before the egg cycle finishes, not because the products don’t work. A six-week schedule that checks the roots and pot rim — not just the leaves — closes the gap that causes most relapses. Before declaring any plant clear, check both of those spots one more time.
Related reading: best houseplant pest control products, how to repot a houseplant without killing it, and how to get rid of spider mites.